Automating Job Applications with Claude Code: A Hands-On Guide to career-agent
Automating the boring stuff in job applications, while keeping the final decision in your hands.
Search for a command to run...
Automating the boring stuff in job applications, while keeping the final decision in your hands.
No comments yet. Be the first to comment.
Automating the boring stuffs ...

Managing S3 Case Sensitivity in Python Workflows

🌩️ Cloud computing has revolutionized how applications are developed and deployed, providing a more flexible and scalable environment for running workloads. AWS offers several services for event-driven computing, including Amazon CloudWatch Events a...

Introduction📝 Looking to streamline your complex workflows and keep everything on track? Look no further than state machines - a powerful tool for precision and ease in process management. 💪🏼 And when it comes to implementing state machines, AWS S...

Hey there!
If you have applied to many engineering roles in a short period, you already know the routine.
You find a role that looks right. You read the job description. You adjust your CV. You write a cover letter that should sound specific, not generic. You upload a PDF. Then you type the same name, phone number, location, LinkedIn URL, GitHub URL, work authorization answer, and application note into another ATS form.
Then you do it again.
After a while, the work becomes less about judgment and more about repetition. That is the part I wanted to remove.
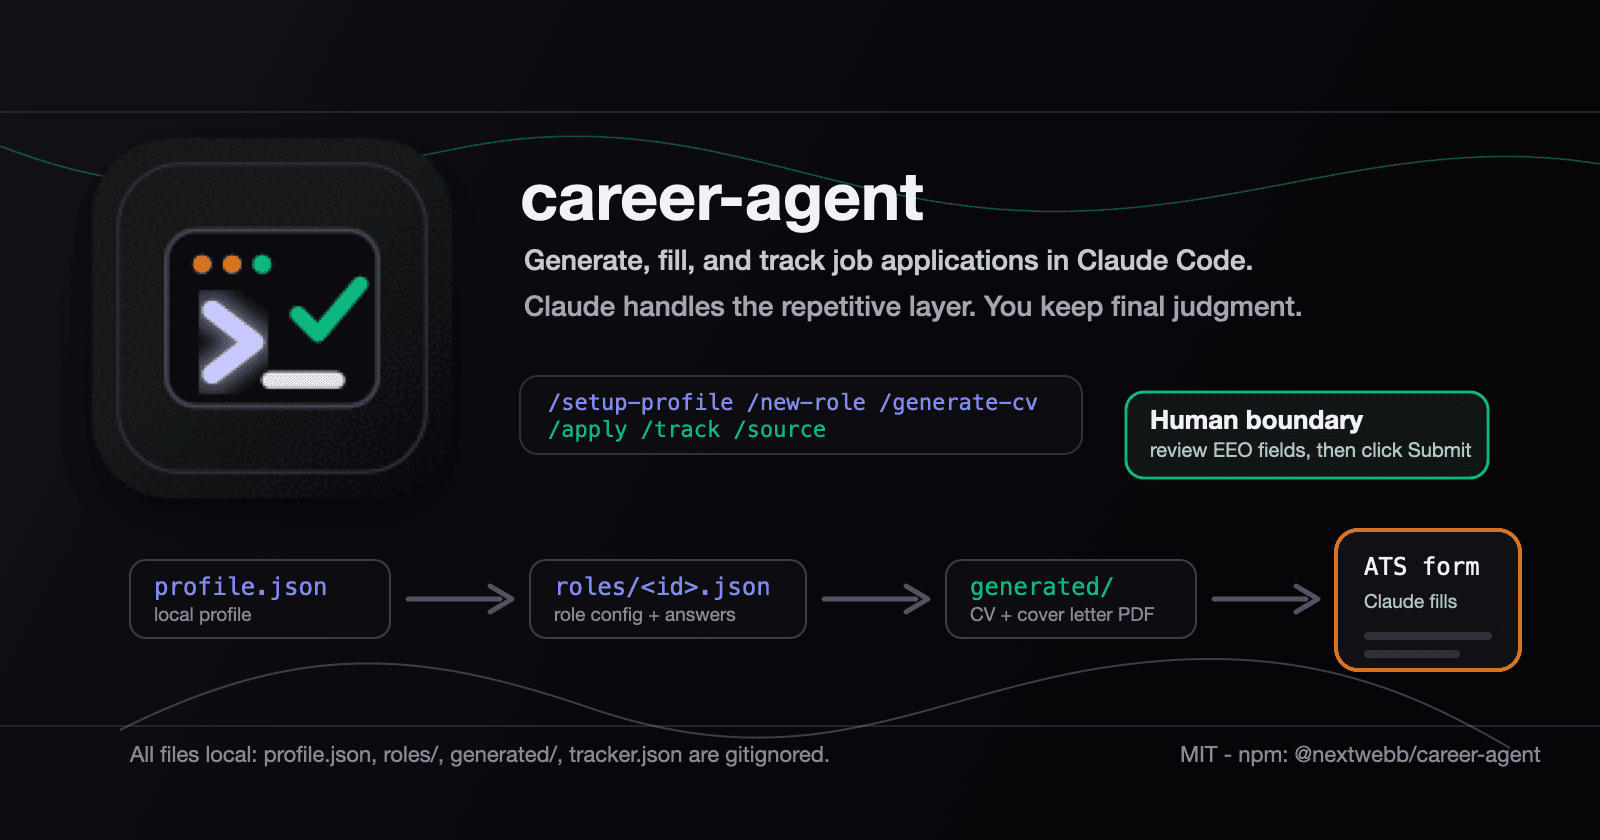
I built career-agent to handle the mechanical layer of job applications from inside Claude Code. It helps you build a local profile, source roles, scaffold role configs, generate tailored PDFs, fill supported ATS forms in Chrome, and track your pipeline.
It does not submit applications for you.
That boundary matters.
The plugin helps you prepare the application. You still review the CV, review the cover letter, answer sensitive questions yourself, and click Submit only when you are ready.
In this guide, I will walk through how to install it, what each command does, where the files live, what I tested, and where you should still slow down.
career-agent is a Claude Code plugin for job application workflows.
It gives you six slash commands:
/setup-profile
/source
/new-role
/generate-cv
/apply
/track
The plugin is not a SaaS app. It is not a hosted job board. It is not a browser extension by itself.
It runs locally through Claude Code and writes files into your workspace:
profile.json
roles/
generated/
tracker.json
Those files are gitignored by default because they can contain personal data, role notes, generated CVs, cover letters, and application history.
That local file model is intentional. I wanted the workflow to be inspectable. If Claude generates a role config, you can open the JSON file. If the CV does not sound right, you can inspect the profile data and regenerate. If an application status changes, you can see it in tracker.json.
This is the high-level command map:
/setup-profile builds profile.json from your CV, LinkedIn export, or pasted profile text/source helps find and shortlist roles based on your profile and search terms/new-role creates a structured roles/<role_id>.json file from a job URL/generate-cv generates a tailored CV and cover letter PDF/apply fills supported ATS forms in Chrome, then stops for your review/track updates the local application pipelineThe supported ATS platforms today are Greenhouse, Lever, and Workable.
That does not mean every page variant will work perfectly. ATS pages differ by company, region, custom fields, embedded forms, and hidden inputs. Treat /apply as a form-filling draft, not as a final application.
The strongest way to think about career-agent is this:
Claude handles the repeated structure.
You handle the judgment.
That means you still decide which roles are worth applying to, what story the cover letter should tell, what sponsorship or location answers are accurate, and when to submit.
I apply to a lot of roles.
When you apply at that volume, the problem is not writing one good CV. The problem is maintaining quality while repeating the same application mechanics many times.
The work breaks into two parts:
Most of the stress comes from the mechanical work leaking into the judgment work.
You start with good intent, but after the twentieth application, small mistakes become easier. Maybe the summary still mentions the previous company. Maybe the cover letter has a generic line. Maybe the tracker is missing a status. Maybe you cannot remember whether you already applied to that role.
career-agent is my attempt to separate those layers.
I want Claude to help with the repeatable workflow, but I do not want Claude to own the irreversible action.
That is why the tool stops before Submit.
For this article, I used a mix of real local runs and documented command behavior.
The install flow was run in a disposable directory with:
npx @nextwebb/career-agent
That verified Python detection, reportlab, Claude Code CLI detection, and profile.json creation.
The generation and tracker screenshots were also produced from a clean temporary workspace using example profile and role data. That means the screenshots do not expose real personal data.
The article screenshots show:
npx @nextwebb/career-agent install runWhat I did not do for this article:
/apply against a live company application form while writing this articleThat distinction matters because a tutorial should not pretend that a browser automation flow is safer or more universal than it is. The local generation and tracking flows are easy to verify. Live ATS automation depends on the page in front of you.
Before installing career-agent, ensure you have these tools installed:
Node.js 18+
Python 3.10+
Claude Code CLI
Claude in Chrome extension, required for /apply
Check your local versions:
node --version
python3 --version
claude --version
Node is required because the setup entry point runs through npx.
Python is required because the PDF generation uses reportlab.
Claude Code is required because this is a Claude Code plugin. The slash commands live inside Claude Code, not inside a standalone web app.
Claude in Chrome is required only for /apply. You can set up your profile, create role configs, generate PDFs, and track applications without touching Chrome. But if you want Claude to fill ATS forms, the Chrome extension needs to be connected to Claude Code.
Note that being signed in to Claude.ai is not enough. Check the Claude in Chrome extension connection before depending on /apply. 📌
Create a workspace for your job application workflow:
mkdir ~/career-agent-workspace
cd ~/career-agent-workspace
Then run the npm setup command:
npx @nextwebb/career-agent
npm package: @nextwebb/career-agent 📦
The setup script checks your local environment and creates a starter profile.json in the current directory.
Specifically, bin/setup.js checks:
reportlabPATHprofile.json already existsIf reportlab is missing, the setup tries to install it with pip. If Claude Code is missing, it stops and tells you to install it first.
This matters because the plugin is not useful if the PDF generator cannot run or if Claude Code cannot see the plugin commands.
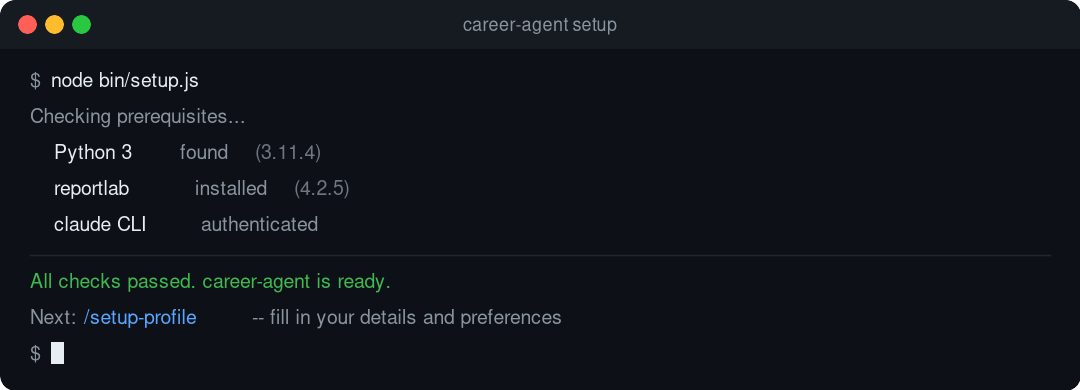
Here is the same install flow from a disposable terminal run:
After the npm setup, register the plugin source:
claude plugin marketplace add nextwebb/career-agent
That command registers the GitHub repo as a Claude Code plugin source. I am not presenting career-agent as an official Anthropic marketplace listing. The evidence-backed claim here is narrower: the installer and manual command use the GitHub-hosted plugin source.
Then install the plugin:
claude plugin install career-agent
Restart Claude Code after installing.
Open a new Claude Code session, type /, and check that the commands appear.
You should see:
/setup-profile
/source
/new-role
/generate-cv
/apply
/track
If they do not appear, check Claude Code plugin settings and confirm that the plugin source was added correctly. ✅
The profile is the center of the workflow.
Run:
/setup-profile
Claude will ask for your CV, LinkedIn export, or pasted profile text. It then creates profile.json.
The profile file is more than a contact card. It stores your name, location, links, experience, education, skills, summaries, and CV variants.
The goal is to give Claude a structured source of truth, so every role-specific output starts from the same base.
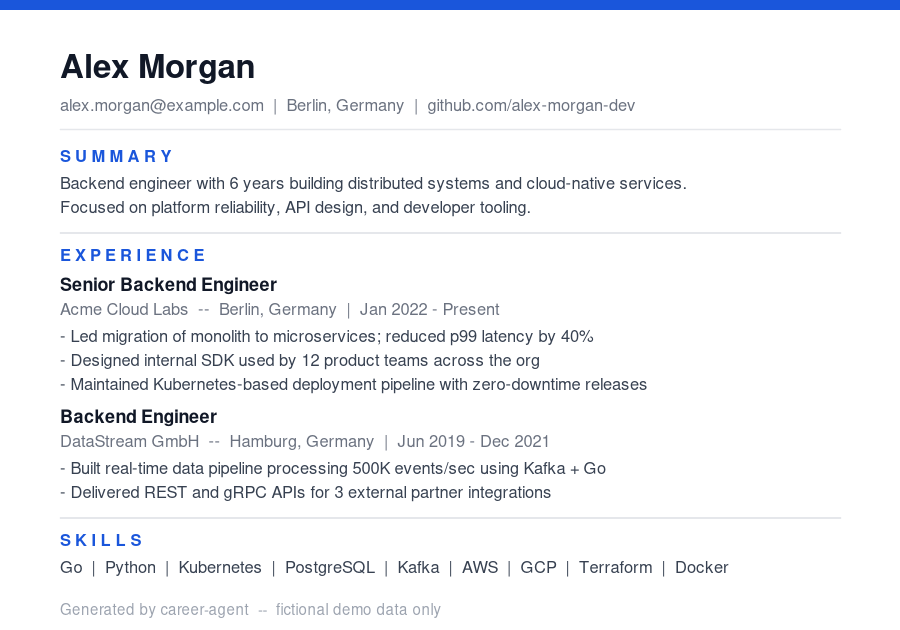
A simplified profile looks like this:
{
  "name": {
    "first": "Jane",
    "last": "Doe"
  },
  "email": "jane@example.com",
  "location": "Berlin, Germany",
  "headline": "Senior Backend Engineer",
  "summary": "Backend engineer with experience building APIs and distributed systems.",
  "links": {
    "github": "https://github.com/janedoe",
    "linkedin": "https://www.linkedin.com/in/janedoe"
  },
  "experience": [],
  "education": [],
  "skills": []
}
The actual schema is larger because it supports variants and per-role bullet sets.
career-agent uses three audience variants:
That is useful because the same experience can be framed differently depending on the role.
For example, a platform migration can matter to backend teams because of reliability and APIs. The same migration can matter to data teams because of pipeline stability and data quality. The facts stay the same, but the emphasis changes.
Review profile.json after generation.
Do not skip this.
PDF extraction is useful, but it is not magic. Dates can be misread. Role titles can be merged. Links can be missed. A summary can sound too broad. You should fix titles, dates, links, and anything that does not sound like you.
This is also the right time to remove anything you do not want used in generated applications.
Before running more commands, it helps to understand what the workspace will look like.
The important paths are:
profile.json
roles/
generated/
tracker.json
profile.json is your base profile.
roles/ contains one JSON file per role.
generated/ contains the CV and cover letter PDFs.
tracker.json stores application status and notes.
All of these are local files. They are also gitignored by default.
This design makes the workflow easy to inspect. If /generate-cv produces a weak PDF, you can inspect the profile and role config. If /apply fills a field badly, you can inspect custom_answers in the role config. If your pipeline feels messy, you can open tracker.json.
That is one of the main reasons I prefer this setup over a hidden workflow.
If you already have a job URL, you can skip /source and start with /new-role.
If you want career-agent to help build a shortlist, run:
/source Germany backend
You can change the location and role type:
/source remote data platform
/source UK AI infrastructure
/source Netherlands backend
The sourcing command uses your profile as the baseline. It is meant to help find roles that match your background, not every role on the internet.
The expected output is a ranked list of roles with direct application URLs, fit notes, and signals around location, sponsorship, and role match.
Use this output as a starting point.
Still verify the important details yourself:
I do not treat sourcing output as final truth. I treat it as a shortlist.
That distinction matters because job pages change, roles close, and sponsorship language is often vague.
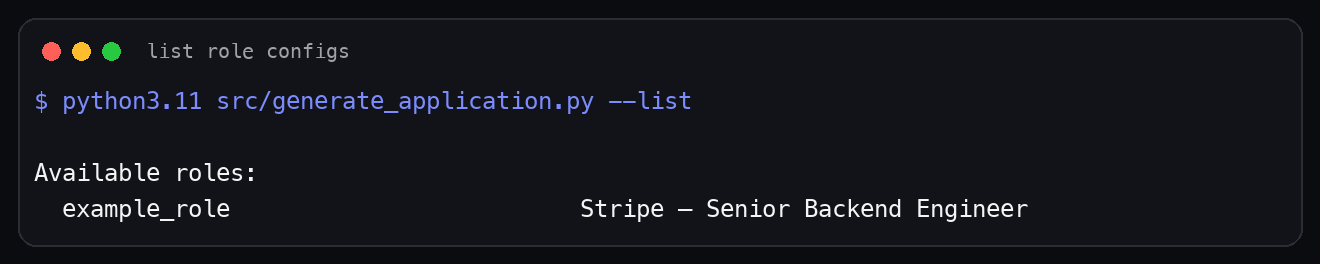
For a role you want to apply to, run:
/new-role <job_url>
This creates a role config under roles/.
The config includes:
A role config gives the rest of the workflow a stable reference. Instead of asking Claude to remember a job description across a long conversation, the role details live in a file.
A simplified role config looks like this:
{
  "role_id": "stripe_backend_2026",
  "company": "Stripe",
  "title": "Senior Backend Engineer",
  "location": "Remote, Europe",
  "url": "https://boards.greenhouse.io/example/jobs/123",
  "ats_platform": "greenhouse",
  "variant": "C",
  "custom_answers": {
    "hear_about_us": "LinkedIn",
    "visa_sponsorship": "",
    "work_authorization": "",
    "why_company": ""
  },
  "cover_letter": {
    "paragraphs": []
  }
}
This is where I slow down.
The scaffold is a starting point. It is not the final application.
Edit the cover letter stubs. Fill in why_company. Add accurate work authorization details. Add salary expectations only if you are comfortable doing so. If the job post includes a reading-check instruction, make sure it is represented correctly.
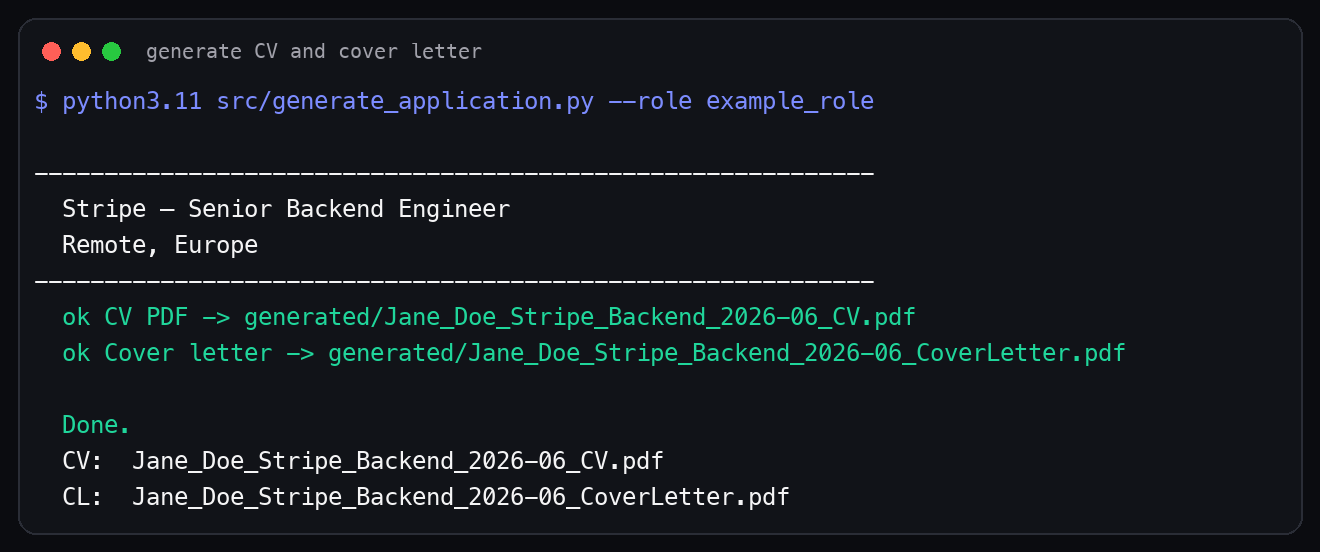
The screenshot below uses the example role config in a clean local workspace:
Once profile.json and roles/<role_id>.json are ready, run:
/generate-cv <role_id>
Under the hood, the generator reads your profile and the role config, then writes two PDFs into generated/.
The output format is:
generated/<output_prefix>_CV.pdf
generated/<output_prefix>_CoverLetter.pdf
The CV is intentionally ATS-safe:
reportlabThat plain layout is not an accident.
Many ATS parsers still struggle with multi-column CVs, text boxes, icons, and complex PDF structure. A clean single-column PDF is less exciting visually, but it is easier for machines and recruiters to parse.
Here is the terminal output from generating the example CV and cover letter:
Open both PDFs before applying.
Check:
The goal is not to invent experience.
The goal is to present the most relevant parts of your real experience for that role.
If the PDF sounds too generic, go back to the role config. If it sounds inaccurate, go back to profile.json. The files are local because you are supposed to inspect and edit them.
For supported ATS pages, open the application in Chrome and run:
/apply <role_id>
career-agent reads the form, maps fields from your profile and role config, and fills what it can.
The supported platforms today are:
Greenhouse
Lever
Workable
The important boundary is this:
Claude fills fields.
You review every field.
You answer EEO and voluntary questions.
You click Submit.
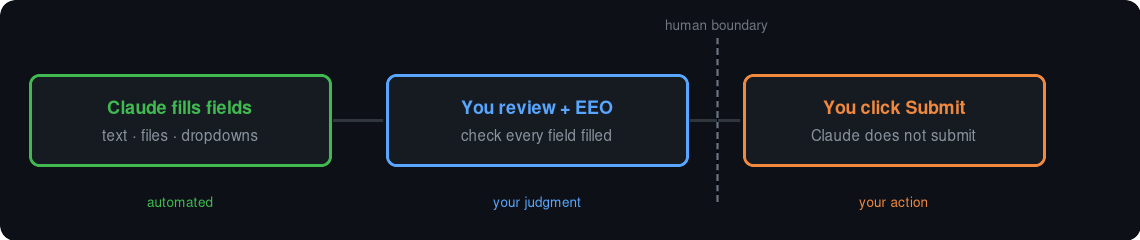
That boundary is deliberate.
Applications often include questions about gender, race, veteran status, disability status, sponsorship, work authorization, consent, relocation, and salary. Some of those are sensitive. Some of them have legal implications. Some of them need context that no tool should guess.
Claude should not answer those for you.
Claude should also not click Submit.
When /apply works well, it saves you from retyping the boring parts. It fills names, links, locations, uploads, and text fields that map cleanly to your local config.
But you still review.
Treat the filled page as a draft. ATS forms vary, even on the same platform. One company may use standard Greenhouse fields. Another may add custom dropdowns, hidden file inputs, or React comboboxes. Review everything before submitting. ❌
If a page is not Greenhouse, Lever, or Workable, you can still use the generated PDFs and tracker manually.
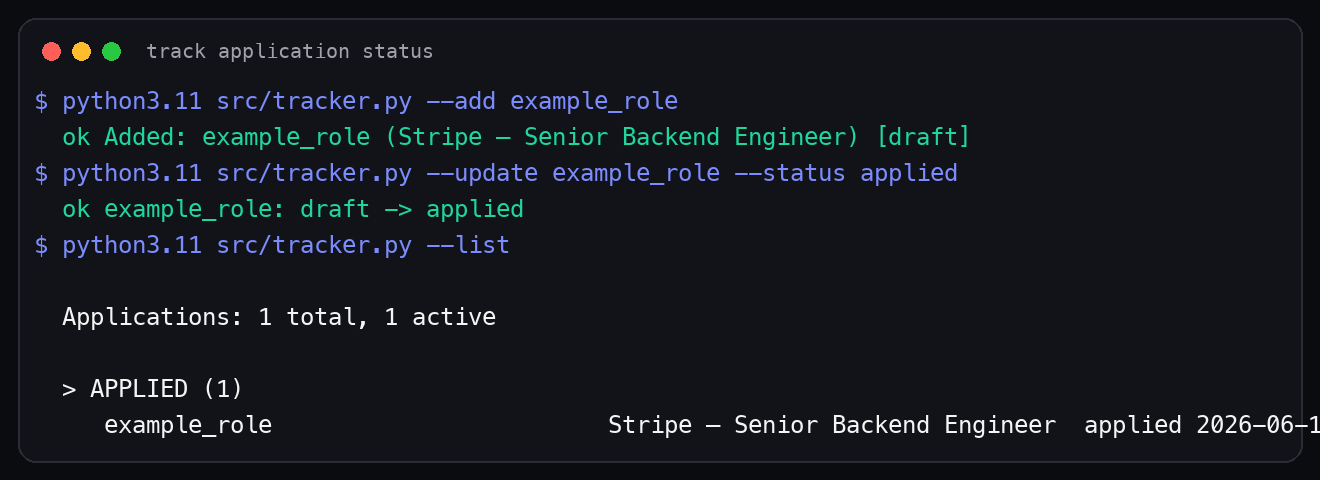
After submitting, update the tracker:
/track update <role_id> status=applied notes="Applied today"
You can also run:
/track
tracker.json gives you one local place for statuses, notes, dates, and follow-ups.
That becomes useful quickly.
When you are applying to many roles, memory is not enough. You need to know which roles are drafts, which ones you applied to, which ones have phone screens, which ones are rejected, and which ones need follow-up.
The tracker supports statuses like:
draft
applied
screen
interview
offer
rejected
withdrawn
Here is a local tracker run using the example role:
The tracker is not meant to replace a full CRM. It is meant to keep the application workflow from becoming scattered across memory, browser tabs, and random notes.
Here is the full flow:
1. Build profile.json with /setup-profile
2. Find or capture a role with /source
3. Create roles/<id>.json with /new-role
4. Generate PDFs with /generate-cv
5. Fill the form draft with /apply
6. Save status with /track

The value is not only one command.
The value is the chain.
/setup-profile gives you a structured base.
/source helps you find roles.
/new-role turns a job URL into a local config.
/generate-cv turns the profile and role config into PDFs.
/apply fills the supported ATS form draft.
/track keeps the status visible.
Because each stage writes or reads a local file, you can stop at any point and inspect the work.
That is important for trust.
If a tool hides the intermediate steps, you have to trust the whole output. If the tool gives you files, you can inspect the profile, inspect the role config, inspect the PDFs, and inspect the tracker.
That is the workflow I wanted.
Let us say I want to apply for a senior backend role in Europe.
I start with sourcing:
/source Germany backend
From that output, I pick a role that looks relevant.
Then I scaffold it:
/new-role https://boards.greenhouse.io/example/jobs/123456
I open the generated role config:
roles/example_backend_2026.json
I check the company name, role title, location, ATS platform, and custom answer fields.
Then I edit the cover letter paragraphs. I want them to reference something real: the company product, the infrastructure problem, the role requirements, or a public engineering post.
After that, I generate the PDFs:
/generate-cv example_backend_2026
I open the CV and cover letter.
If the summary sounds too generic, I edit the role config. If the experience bullets feel wrong, I update the profile. If the cover letter feels like filler, I rewrite it.
Only after that do I open the application page and run:
/apply example_backend_2026
Claude fills what it can.
I review the form, answer EEO fields myself, check the uploaded files, and submit manually.
Then I track it:
/track update example_backend_2026 status=applied notes="Applied after reviewing form"
That is the loop.
It is not magic. It is a structured local workflow.
The first thing I like is that the data stays local.
Job application data can be personal. It includes phone numbers, locations, employment history, immigration details, compensation expectations, and private notes. Keeping that in local gitignored files makes the workflow easier to reason about.
The second thing I like is that the tool has a natural review point.
The generated PDFs are not hidden. You open them. You read them. You decide whether they represent you well.
The third thing I like is that /apply has a human boundary.
I do not want a tool clicking Submit on my behalf. It is too easy to get one field wrong and send a bad application. It is also not appropriate for a tool to guess voluntary self-identification answers.
The fourth thing I like is that the workflow is composable.
You do not need to use every command every time. If you already have a role URL, start with /new-role. If you only want PDFs, stop after /generate-cv. If the ATS is unsupported, fill the form manually and still use /track.
That flexibility matters because real job applications are messy.
The review step is the part I do not automate.
That might sound strange after building a tool to automate job application work, but this is the boundary that makes the workflow usable for me.
When /apply fills a form, I treat the result as a draft. I do not treat it as a completed application. That mindset matters because even a good automation can misunderstand a field label, miss a hidden requirement, or map a custom question too broadly.
Here is the review checklist I use before I submit:
1. Confirm the company and role title
2. Confirm the uploaded CV and cover letter are the right files
3. Read every pre-filled text field
4. Check phone, email, location, and links
5. Check work authorization answers
6. Answer EEO or voluntary self-identification fields manually
7. Check custom screening questions
8. Check final consent boxes
9. Submit manually
10. Update tracker.json
The first check sounds obvious, but it catches mistakes.
If you are applying to several roles in one session, it is easy to generate files for one role and open a different tab. The file names help, but I still check the company name and title before moving forward.
The second check is the uploaded file check.
Many ATS forms show the uploaded filename after upload. I check that the CV and cover letter match the current role ID. If I see the wrong role name in the filename, I stop. It is better to catch that before Submit than to explain it later.
The third check is every text field.
I read the filled fields the way a recruiter would see them. Not as code. Not as JSON. As a person reading an application. If the answer feels too long, too vague, or too generic, I edit it in the form before submitting.
Work authorization deserves its own pause.
Do not let a tool guess this. If the role asks whether you need sponsorship now or in the future, answer based on your actual status and the wording of the form. If the wording is unclear, slow down and decide carefully. The tool can carry your configured answer, but it should not decide the answer for you.
EEO and voluntary self-identification fields are also yours to answer.
career-agent is designed not to fill those fields. That is intentional. Those fields can be sensitive, jurisdiction-specific, and personal. If you want to answer them, answer them yourself. If you prefer not to answer, choose that option yourself.
The final thing I check is consent.
Some applications include checkboxes for privacy policies, talent pools, communication consent, or data retention. I do not want automation accepting those for me without review. Read the labels. Decide what you agree to. Then submit.
After submission, I update the tracker immediately:
/track update <role_id> status=applied notes="Submitted after manual review"
That note looks small, but it helps later.
When you are applying at volume, the tracker becomes memory. It tells you what happened, when it happened, and what you need to follow up on.
The best way to use this tool is not to rush from job URL to Submit.
For me, the better workflow is batching.
I separate the week into sourcing, preparation, generation, review, and submission. That keeps the work calm. It also reduces mistakes because I am not trying to research a company, rewrite a cover letter, generate PDFs, fill a form, and update a tracker in one tired session.
Here is a realistic week:
Monday: source roles and build a shortlist
Tuesday: create role configs
Wednesday: edit cover letters and custom answers
Thursday: generate PDFs and review them
Friday: apply, submit manually, and update tracker
You do not need to follow that exact schedule, but the separation is useful.
On sourcing days, I focus on finding roles that are worth the time.
I might run:
/source Germany backend
/source remote AI infrastructure
/source UK data platform
Then I read the shortlist and remove roles that do not fit. I am not trying to apply yet. I am trying to decide what deserves attention.
On role config days, I run /new-role for the strongest matches:
/new-role https://boards.greenhouse.io/example/jobs/123
/new-role https://jobs.lever.co/example/456
That gives me structured files under roles/.
At this point, the job application becomes editable data. I can inspect the title, location, ATS platform, CV variant, and custom answer fields. I can also keep the job description context close to the generated application materials.
On writing days, I edit the role configs.
This is where the application becomes specific.
I do not want a cover letter that says, "I am excited about your mission" and nothing else. I want the letter to mention the actual engineering problem, the product surface, the infrastructure shape, or the team context where I can add value.
For example, instead of this:
I am excited about the opportunity to contribute to your team.
I would rather write this:
Your backend platform work around payments, reliability, and developer-facing APIs maps closely to the systems work I have done across Python, Go, AWS, and Kubernetes.
That second version is still simple. It does not pretend to know private company details. But it is specific enough to show that the application was not generated blindly.
On generation days, I run:
/generate-cv <role_id>
Then I open the generated PDFs.
I do not review PDFs in bulk without reading them. That defeats the point. The generation step saves time, but the review step protects quality.
On submission days, I open the application forms and run /apply.
The goal is not to submit as fast as possible. The goal is to remove repeated typing so I can spend my energy reviewing the parts that matter.
That distinction is important.
If you are applying to ten roles in a day, the worst outcome is not that the work takes longer than expected. The worst outcome is sending ten weak or incorrect applications quickly.
profile.json is the base layer of the whole workflow.
If it is inaccurate, every generated output can inherit that inaccuracy.
That means the profile deserves careful review before you rely on it.
After running /setup-profile, I check these sections first:
name
email
phone
location
links
headline
summary
skills
experience
education
variants
The easy fields are name, email, phone, and links. Still check them.
Phone numbers can lose country codes. LinkedIn URLs can be pasted without the full path. GitHub URLs can be wrong if your CV had an old link. These are small issues, but they are visible to recruiters.
The summary needs more attention.
A generated summary can sound correct but still not sound like you. It might over-index on one part of your background. It might sound too broad. It might use words you would not use in an interview. Edit it until you can read it out loud without feeling awkward.
Skills are another place where honesty matters.
I prefer listing skills I can defend in a technical conversation. If a tool extracts every technology that appears once in a project bullet, the skill list can become noisy. Remove tools you only touched lightly. Keep the ones that represent your real working experience.
Experience bullets deserve the most time.
A good bullet should include what you did, the system or product area, and the outcome where you can support it.
This is weak:
Worked on backend APIs.
This is better:
Built and maintained Python backend APIs for internal workflow automation, reducing repeated manual operations for support and operations teams.
If you have numbers, use them. If you do not have numbers, do not invent them.
It is better to write a clear factual bullet than to add a fake metric.
The variant sections are where career-agent becomes more useful.
Variant A can emphasize AI and evaluation work. Variant B can emphasize data platforms and pipelines. Variant C can emphasize backend systems and APIs. The facts should stay the same, but the ordering and framing can change.
That is normal.
Different roles care about different parts of the same background. The important part is that every variant remains true.
I also recommend keeping a clean backup of a reviewed profile:
cp profile.json profile.reviewed.json
Note that both files can contain personal data, so keep them in the gitignored workspace. Do not commit them.
Before a serious application batch, I run a quick profile check:
python3 -m json.tool profile.json > /tmp/profile.checked.json
That verifies the JSON syntax. It does not verify the content, but it catches broken commas, missing quotes, or accidental edits that would break the workflow.
/source is useful, but I do not treat it as a replacement for judgment.
I treat it as a shortlist builder.
That distinction keeps expectations realistic.
A sourcing command can search based on your profile, location, and keywords. It can return roles that look aligned. It can help organize signals like location, sponsorship wording, company, title, and fit score.
But job markets are messy.
Roles close without notice. Companies repost old roles. Some career pages keep expired roles indexed. Some job boards cache listings after the company page has changed. Some postings mention remote work in one section and office requirements in another.
So when /source returns a role, I still verify:
Is this role still live on the company site?
Is the application URL direct?
Is the location compatible with me?
Does the role match my level?
Does the role match the kind of work I want?
Is sponsorship or relocation actually stated?
I am careful with sponsorship language.
If a job post explicitly says sponsorship is available, that is a strong signal. If an uploaded company list says a company has sponsored before, that is not the same thing. It can help you decide where to look, but it does not prove this role sponsors now.
That is why the role config still needs review.
Use /source to reduce random browsing. Use your judgment to decide whether the role deserves a tailored application.
Here is the flow I recommend:
/source <location> <role_type>
read the shortlist
open the strongest company pages
verify the role is live
run /new-role on the real application URL
edit the role config
generate PDFs
apply with review
By using /source this way, you keep the benefit without pretending it knows everything.
Generated PDFs should be reviewed visually and textually.
First, I read the CV as a person.
I ask:
Can I understand the role target in the first 10 seconds?
Does the summary match the job?
Are the strongest experiences near the top?
Do the skills match the role without looking stuffed?
Are the bullets specific?
Are dates and titles correct?
Are links present and readable?
Then I review it as an ATS would parse it.
That means I avoid being impressed by visual decoration. The layout is supposed to be plain. A single-column CV might look less fancy than a design-heavy resume, but it is easier to parse.
If you want to test extraction, you can use a local PDF text tool:
pdftotext generated/<file>.pdf - | head -80
If pdftotext is not installed, skip this check or install Poppler through your package manager. This is optional, but useful when you want confidence that the PDF text is extractable.
For the cover letter, I check tone.
A cover letter should sound like a human wrote it for this role. It does not need to be dramatic. It needs to be specific, honest, and easy to read.
I look for these problems:
If I find those issues, I do not edit the PDF directly. I edit the role config or profile, then regenerate.
That keeps the source of truth clean.
This article is meant to teach the workflow from a practical angle.
The docs page is there for quick reference:
nextwebb.github.io/career-agent 📌
I would use both together.
Use the article when you want the full flow and the reasoning behind the boundaries. Use the docs page when you want the command list, repository context, and landing page reference.
That is why I wanted the GitHub Pages site live before publishing this.
If someone reads the article and wants to check the project quickly, they should have somewhere clear to go. The repo is the source of truth for code. The npm page is the source of truth for the package. The docs page gives the project a cleaner entry point.
The three links serve different jobs:
GitHub repo: code, issues, PRs, license
npm package: installable package metadata
docs page: quick project overview
Here they are:
github.com/nextwebb/career-agent
nextwebb.github.io/career-agent 📌
The most useful contributions are not cosmetic.
The best contributions improve one of three things:
ATS coverage
field mapping reliability
documentation from real usage
ATS coverage matters because companies use different systems.
Greenhouse, Lever, and Workable are handled today. But many companies use Ashby, iCIMS, SmartRecruiters, Taleo, BambooHR, custom Workday flows, or embedded forms. Each platform has its own field patterns, file upload behavior, and validation rules.
If you want to contribute a new ATS adapter, start by documenting the page shape.
Useful notes include:
ATS platform name
example public application URL
field labels shown on page
input names or IDs if visible
file upload behavior
required fields
custom question behavior
submit button behavior
fields the tool should never fill
Do not include private applicant data in an issue.
If the page can be shared publicly, include the job URL. If it cannot, describe the structure and redact sensitive information.
Field mapping reliability is the second big area.
This is where small improvements matter. A field labeled "Preferred name" should not always map to legal first name. A field labeled "Current company" should not map to target company. A field labeled "Website" might accept GitHub, personal site, or portfolio depending on the form.
These are not glamorous problems, but they are the real problems in application automation.
Documentation is the third area.
If you use the tool and find a confusing step, open an issue. If a command output is unclear, say so. If a setup step fails on Linux, Windows, or a different Python environment, include the exact output.
Good bug reports make the tool better faster.
Useful issue format:
Command:
Expected:
Actual:
OS:
Node version:
Python version:
Claude Code version:
ATS platform, if relevant:
Redacted screenshot or terminal output:
That gives enough context for someone to reproduce the issue without guessing.
career-agent handles repeated work. It does not remove your responsibility.
It does not submit applications.
It does not answer EEO or voluntary self-identification fields.
It does not enter passwords or credentials.
It does not guarantee every ATS page will work.
It does not make weak applications strong.
It does not replace your judgment about whether a role is worth applying to.
That last point matters. A tool can help you apply more consistently, but it cannot decide what kind of work you should do next. It cannot know which company culture you want. It cannot know whether a role is worth your time. It can help with the structure, not the life decision.
There is also a documentation boundary around /source.
The command is designed to find and verify open roles, score fit, and return application URLs. But any sourcing workflow should still be checked against the company career page. Roles close. Pages change. Sponsorship language can be unclear.
Use /source to build a shortlist. Do not treat it as a final truth source.
If npx @nextwebb/career-agent fails, check Node first:
node --version
You need Node 18 or newer.
If setup says Python is missing, check:
python3 --version
python3.11 --version
The installer looks for Python 3.10 or newer. On some machines, python3 may point to an older version while python3.11 exists.
If reportlab is missing, install it:
python3 -m pip install reportlab
If claude --version fails, install or fix Claude Code CLI before continuing.
If the slash commands do not appear after install, restart Claude Code and check the plugin settings.
If /apply cannot control Chrome, check that Claude in Chrome is installed and connected to Claude Code. Again, signing in to Claude.ai alone is not the same thing.
The code is open source and MIT licensed.
The repo is here:
github.com/nextwebb/career-agent
The live docs are here:
nextwebb.github.io/career-agent 📌
The npm package is here:
The main contribution area is ATS support.
Greenhouse, Lever, and Workable are the current supported platforms. Ashby, iCIMS, SmartRecruiters, Taleo, and BambooHR are good candidates for future support.
If you want to contribute, open an issue first. Include the ATS platform, a sample public application URL if you can share one, what fields were missed, and what behavior you expected.
Good issues make automation work easier.
career-agent gives you a local Claude Code workflow for preparing job applications.
It helps you build a profile, source roles, create role configs, generate tailored PDFs, fill supported ATS forms, and track your pipeline.
It does not remove the need to think.
That is the point.
Use it for the repeated work. Slow down where accuracy, consent, and judgment matter.
Star the repo: github.com/nextwebb/career-agent ⭐
Read the docs: nextwebb.github.io/career-agent 📌
npm package: @nextwebb/career-agent 📦
Upvote on Product Hunt if this was useful: career-agent 🚀
If you find a bug or want to add ATS support for Ashby, iCIMS, SmartRecruiters, Taleo, or another platform, open an issue or send a PR.
If you have any inquiries or wish to gain additional knowledge, please get in touch with me on GitHub, Twitter/X, or LinkedIn. Kindly show your support by leaving a thumbs up 👍, a comment 💬, and sharing this article with your network 😊.